Showing posts with label cupcakes. Show all posts

Saturday, August 6, 2011

Mini Cherry Pies


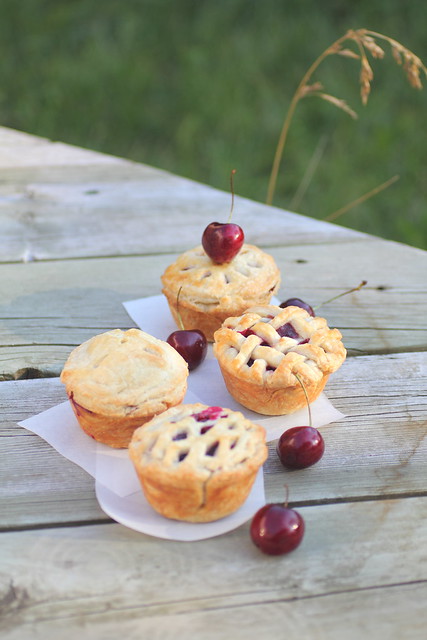
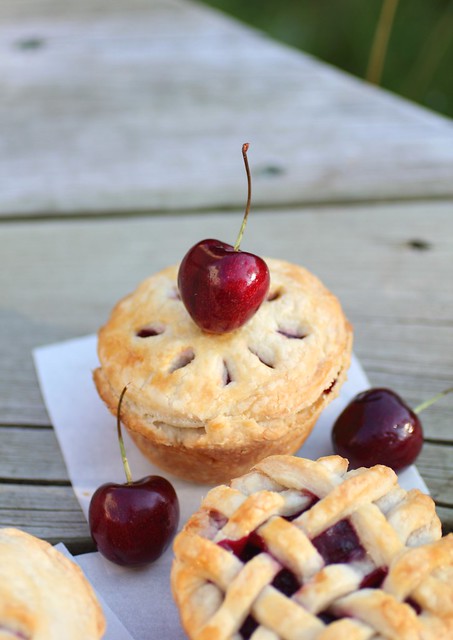
If pies are the new cupcake then these mini cherry pies can rival any cupcakes in the cuteness category and they're 100% home-made and so delicious!


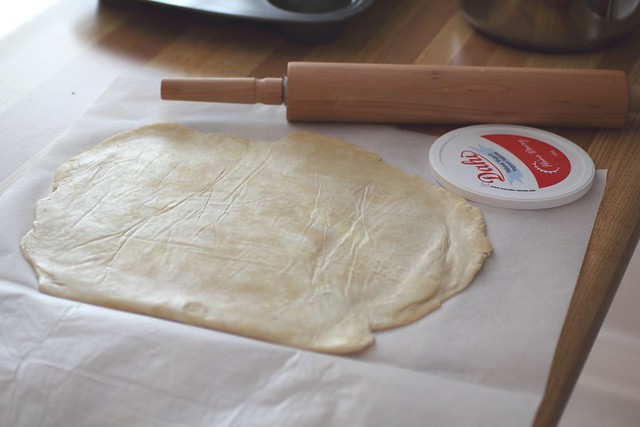
Start with the Pate Brisee, I had leftover from the other day's apple marzipan galette, Pie dough is easily made ahead of time, frozen and left to thaw in the fridge overnight for convenient use.

Martha Stewart's recipe is one of my favourites, however I've altered it slightly below:

Ingredients

2 1/2 cups all-purpose flour

1 teaspoon salt


2 sticks (1 cup) unsalted butter, cold, cut into small cubes


1/4 cup ice water, plus more if needed

1 tsp lemon juice (mixed into the ice water)


Directions


In the bowl of a food processor, combine flour and salt; pulse to combine. Add butter, and pulse until mixture resembles coarse crumbs with some larger pieces remaining, about 10 seconds. (To mix by hand, combine dry ingredients in a large mixing bowl, then cut in butter with a pastry blender or use tips of fingers to rub the butter and flour together, working quickly as not to warm up the ingredients .)

With machine running, add (lemony) ice water through feed tube in a slow, steady stream, just until dough holds together without being wet or sticky. Do not process more than 30 seconds. Test by squeezing a small amount of dough together; if it is still too crumbly, add a bit more water, 1 tablespoon at a time.

Turn out dough onto a clean work surface. Shape into flattened disk. Wrap in plastic, and refrigerate at least 1 hour or overnight. The dough can be frozen for up to 1 month; thaw overnight in the refrigerator before using.

----


With the last of the season cherries I picked up the rest was easy, pitting was the most fun using the cool technique I learned recently and used on my cherry dumplings here.

I think this is probably one of the most useful and exciting tips I've ever learned because before this I would avoid cherries, using a parring knife to peel the flesh around the pit was not fun at all!

 I double the recipe of pie dough above and make 2 flattened disks to refrigerate then I make pie filling using 2 bags of cherries as directed below:

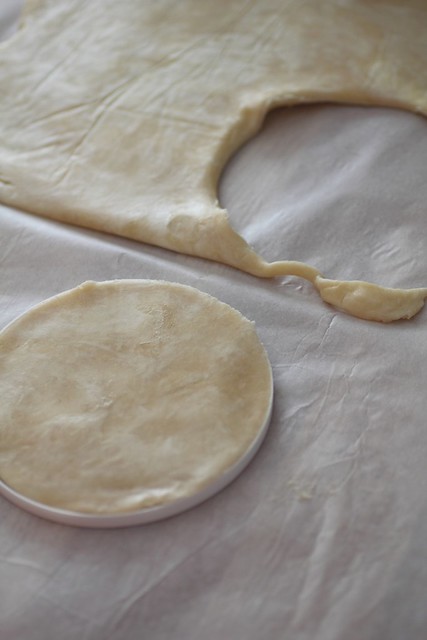
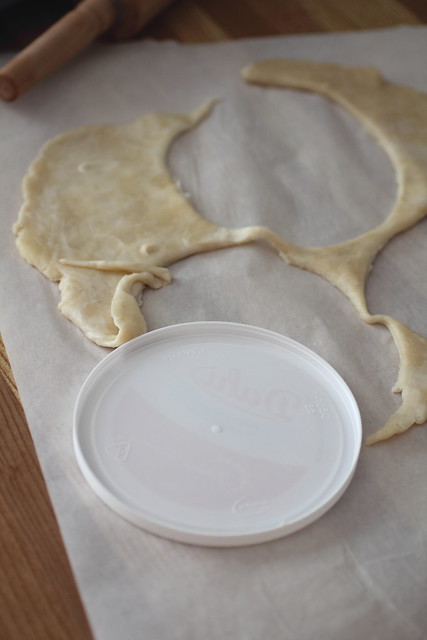
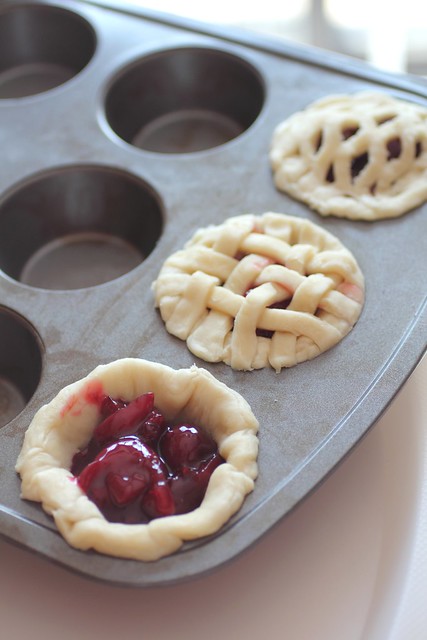
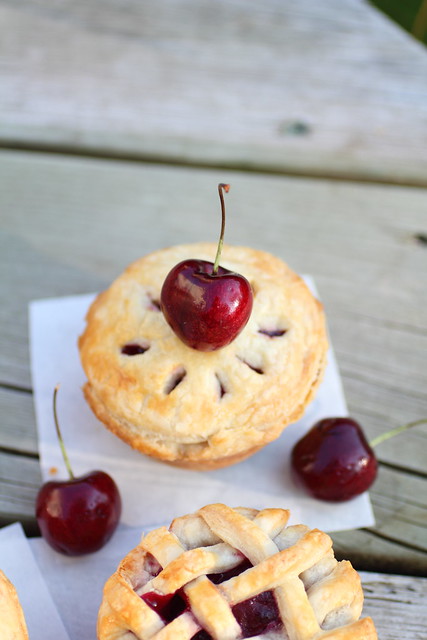
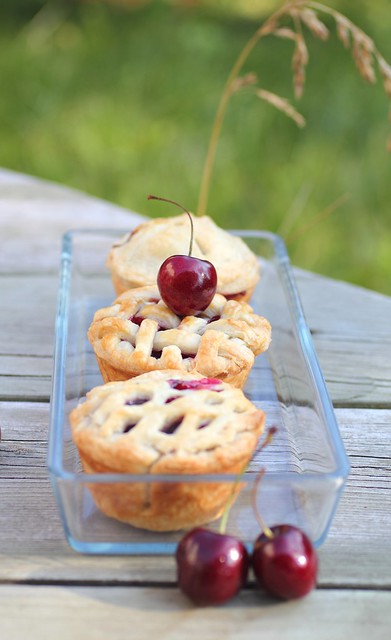
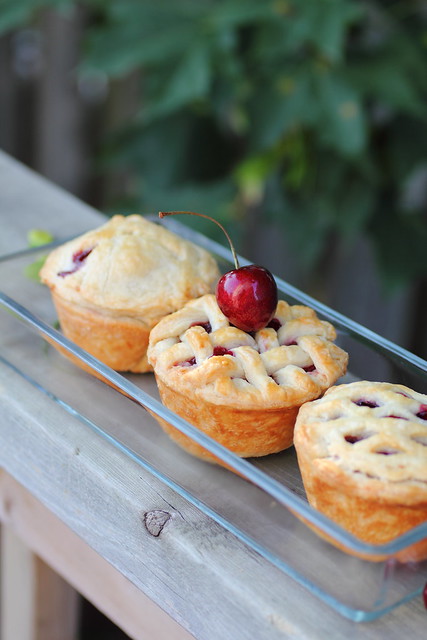
Doubling the pie dough pastry should make about 12 mini (covered) pies with some cherry filling leftover.
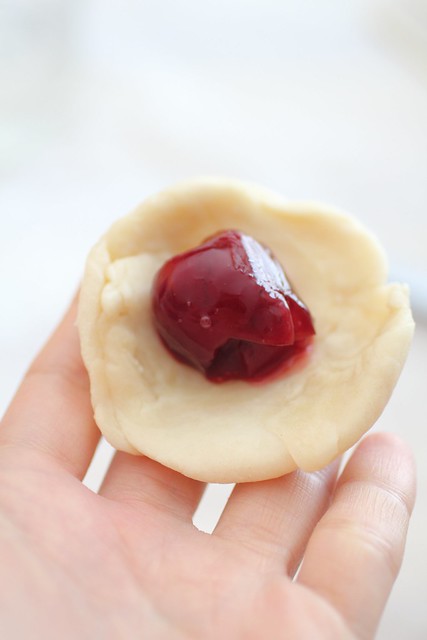
OR you can make about 24 open face  tart like pies (like here)
 with all the filling.


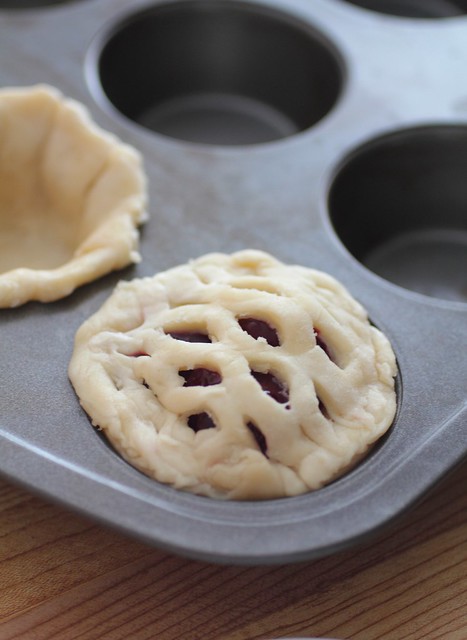
An alternate and easier design to do for covered pies is something like this 


Cherry pie filling:


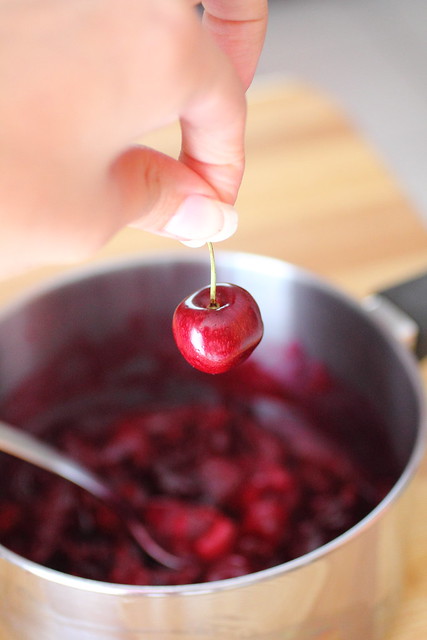
-2 bags of cherries (about 80 cherries, or 2 lbs of cherries)

Remove stems, wash, and using a paring knife cut an X in the bottom of each one.

Doing this assembly style is best. Wash, then begin cutting them and moving them into another bowl.

Once finished all, use a chopstick to push through the top of the cherry (where the stem was) to remove the seed/pit. Once pitted add them to a heavy bottomed saucepan.

Add:
- 1/2 cup sugar
- Juice of half a lemon
- 2 tbsp water

Bring to a boil and cook on medium low for about 15 minutes.

Mix together in a small bowl the following ingredients:

- 1 tsp cornstarch
- 1 tbsp ice water

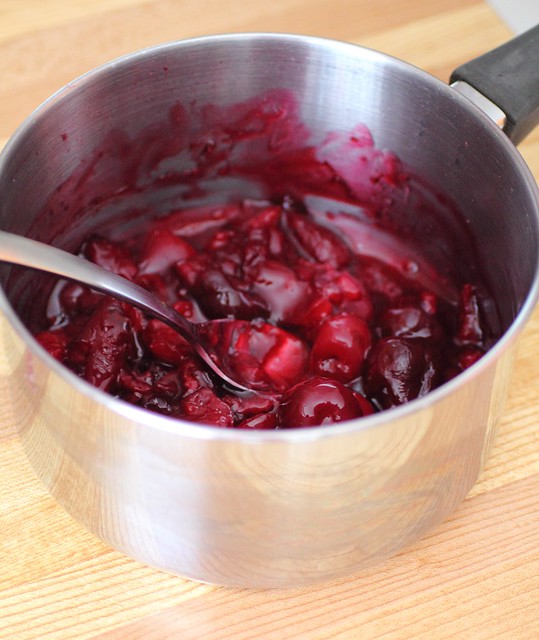
Bring the cherry filling to a boil again and quickly mix in the cornstarch mixture.

Stir the cornstach mixture into the cherries and you'll see it thicken immediately.  Remove from heat and place the filling in another bowl to cool. Place a sheet of plastic wrap on top of the cherries to avoid a seal forming on the top.

Allow to cool completely then refrigerate until ready to use.

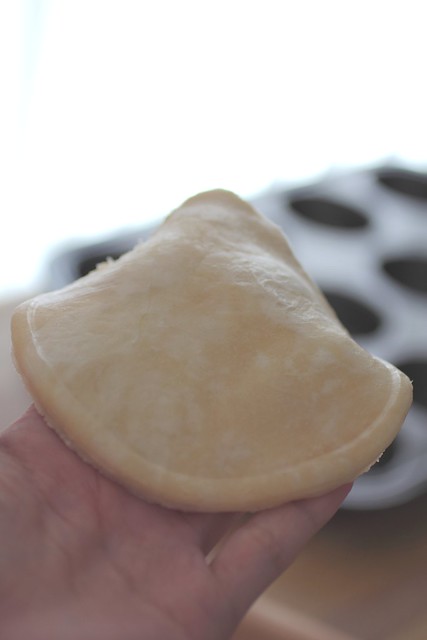
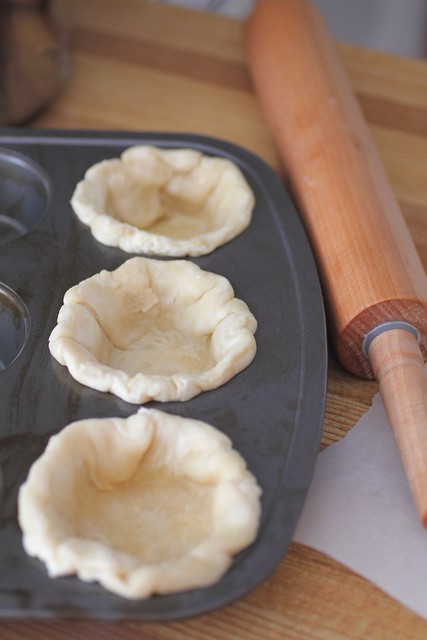
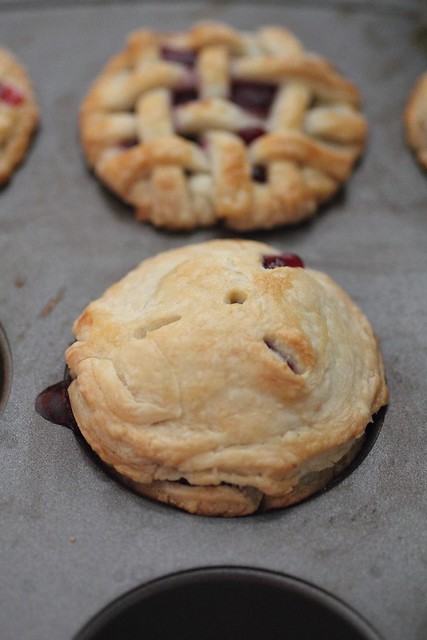
Ok so these little pies were made right in the cupcake pan.. no greasing or anything required. Just cut the dough and put it straight in.

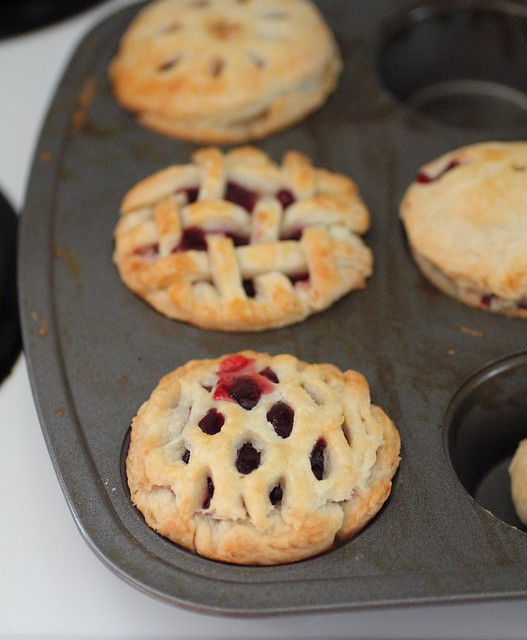
The filling should be cool of course and you can begin your assembly creating any type of design you like. Here I made three different designs ...

Use some eggwash to create a nice sheen on the little pies before baking..

Bake between at 375 for 30 mins or so until the pastry is crispy and golden browned where it touches the pan.


Thursday, July 21, 2011

Honey Beehive Cupcakes


On sunday we all went to see the new Winnie the Pooh movie in theatres. Unfortunately we didn't like the movie all that much (and we're fans of the old Winnie the Pooh movie) but the treats we had afterwards made up for it.

These brown butter banana honey cupcakes are one of my new favourites, you can really taste the honey and the banana creates a moist cupcake. Try a swiss meringue buttercream with a bit of honey folded in, or if you like whipped cream that's fine too, sweetened with a hint of honey they are super easy to do and only require a handful of ingredients.

Brown butter banana honey cupcakes:


1 cup (2 sticks) unsalted butter

2 ½ cups all-purpose flour

1 ½ teaspoons baking powder

¾ teaspoon baking soda

½ teaspoon salt

1 cup sugar

½ cup honey

1 teaspoon vanilla

2 eggs, room temperature

1 ½ cups banana puree (about 4 bananas)

½ cup buttermilk (or yogurt watered down into the consistency of melted ice cream)

Preheat oven to 350°F.

To make brown butter: In a small heavy bottomed saucepan cook the butter over low heat until the butter is caramel coloured and smells toasty. DO NOT skim off any foam because those are the milk solids and they are what create the flavour once they toasts, because the rest is just melted fat and will not develop flavour on it's own.

Strain the mixture to remove the brown bits. (You can do this step a day ahead, it keeps in the fridge and then you just melt the butter again in the microwave when you're ready to use)

To make the cupcakes:

Using the paddle attachment, beat together the brown butter (which is now melted), sugar, honey and vanilla until it is cooled off slightly. Add the eggs one at a time, mixing well after each. Add the banana puree and mix until incorporated.

In a medium bowl whisk together the flour, baking powder, baking soda, salt. Set aside.

Alternate adding the flour mixture and buttermilk, starting and ending with the dry ingredients.

Line your cupcake pan with wrappers and begin filling them (not too much or it will over flow!)

Bake for 15-17 mins (17 worked great for me)


Swiss Meringue Buttercream:

Follow this recipe but instead of using the berry mixture add in a bit of honey at the end, 2 tbsp or so and a dash of salt and incorporate.


For honey Whipped Cream:

Pour your chilled heavy cream in the bowl and add some powdered sugar and whip until it's a beautiful creamy whipped consistency, add vanilla and drizzle in a bit of honey and fold in.

Decorate your cupcakes with either of the frostings above using a piping bag and a large round piping tip (I used Wilton No.2A) and begin piping a flat disk onto the cooled cupcakes and making circles smaller and smaller as you go higher to create a beehive look.


Later in the day we enjoyed Chicken and Dumplings, click here for the recipe.


Thursday, July 14, 2011

Glimpses of Saturday's Wedding Party

Here are some glimpses of the party we attended on Saturday evening.

I loved the little touches from gorgeous fresh flowers to decor. The cupcake garden which was made by a friend of ours was quite a show stopper on the dessert table!

We all had a really amazing and fun time!


Friday, June 3, 2011

A fun day of cooking and baking!


Rich & Dark Chocolate Cupcakes

Yield: 18 standard cupcakes *** (We made 12 and an entire loaf cake since we ran out of the foil wrappers!)

Ingredients:

1 3/4 cups all-purpose flour

2 cups granulated sugar

3/4 cup Cacao Barry Cocoa Powder – Extra Dark

2 teaspoons baking soda

1 teaspoon baking powder

1 teaspoon salt

2 eggs

1 cup strong, hot black coffee *** ( I did not want the coffee flavour so I just used hot water, cooled a bit)

1 cup buttermilk, room temperature

1/2 cup vegetable oil

1 tablespoon pure vanilla extract

Method:

Preheat oven to 350 F. Line muffin/cupcake tin with paper or foil cupcake liners. In bowl of electric mixer, sift all dry ingredients. Add all remaining ingredients to bowl with the dry ingredients and with paddle attachment on mixer, mix for 2 minutes on medium speed (you may need the plastic splash-guard that comes with mixer) and pour into prepared cupcake pan until 2/3 full (or just less). Batter will be liquidy.

Bake for 15-17 minutes, or until toothpick or skewer comes out with a few crumbs. Try not to overbake. Cool on wire racks in pans for 5 minutes then gently turn cupcakes onto racks until completely cool.

Raspberry Swiss Meringue Buttercream

*Essentially, this is vanilla Swiss Meringue Buttercream with some clean, dry, fresh raspberries into it. It doesn’t require many raspberries to give it a nice flavour, but it’s personal preference. You can also use seedless raspberry-puree for a smooth finish. Add a drop of pink food colouring for a touch more pink.

Swiss Meringue Buttercream

Because it does take some time to make, I always make in batches of 3 (vanilla), because it freezes so well and saves time. A batch of 3 fits perfectly in a 5QT KitchenAid mixer bowl. You can then thaw, divide, add separate flavours, purees, etc. I have recently decreased the amount of butter I use in my buttercream, because I find it has a lighter, fluffier quality to it. I’ve adjusted the recipe accordingly, but you can add more butter if you prefer. I’ve also recently started heating the egg whites and sugar to 160° F, rather than 140° F, and I find the meringue comes together so quickly this way (just an observation, however 140° F has worked for me for years). Just a note!

Yield: 5 cups

Ingredients

5 large egg whites (30g each–total 150g)

1 cup plus 2 tablespoons superfine granulated sugar

3/4 pound (3 sticks) unsalted butter, softened, cut into cubes

2 teaspoons pure vanilla extract

Pinch of salt

*1/2 pint fresh, rinsed & dried raspberries (optional)

Method

Wipe the bowl of an electric mixer with paper towel and vinegar, to remove any trace of grease. Add egg whites and sugar, and simmer over a pot of water (not boiling), whisking constantly, until temperature reaches 160 degrees F, or if you don’t have a candy thermometer, until the sugar has completely dissolved and the egg whites are hot.

With whisk attachment of mixer, begin to whip until the mixture is thick, glossy, and cool. Switch over to paddle attachment and, while mixing on medium speed continously, add softened butter in chunks until incorporated, and mix until it has reached a silky smooth texture (if curdles, keep mixing and it will come back to smooth). Add vanilla and salt, mix well. You can also add a wide variety of flavourings, extracts, and more.

Notes:

Add about a 1/2 pint of fresh washed & dried raspberries if you like the textured effect, or raspberry puree for a smooth finish.

You can also add a drop or 2 of pink gel colour to get a pinker look.

Keep in airtight container in refrigerator for up to one week, leaving out at room temperature when needed, rewhipping in mixer for 5 minutes.

Can freeze for up to 6-8 weeks. To thaw, place on counter overnight, and rewhip for 5 minutes with paddle attachment in an electric mixer.

Makes approximately 5 cups of buttercream.

*Recipe for Swiss Meringue Buttercream adapted from Martha Stewart.

Thanks to Sweetoplita for the recipe, *** I used fresh blackberries with 1 tbsp of four fruit jam (blackberry, strawberry, raspberry and cherry) in my buttercream.

Most of the photos courtesy of my three amazing sisters and are featured on Munch n' Crunch