Thursday, May 30, 2013

Mango salsa


Summer is the perfect time for this refreshing sweet mango salsa! 

- 2-3 Ripe mangoes (peeled, and flesh removed from the seed then diced) 
- 1 small red onion, finely diced

- Salt & Black pepper
 - Lime juice (a nice squeeze)
- Olive oil (about 1/2 tsp, optional) 
- garlic (about 1/8 tsp puree, optional) 

For a real fresh version blend together the mangoes, red onion, lime juice, salt and pepper and serve!

For a more complex version add the remaining ingredients and blend, add a dash of cumin or paprika if desired.

Enjoy it as fresh as possible as a snack of along side grilled meats or a light summer spread.


Wednesday, May 29, 2013

Curly Dogs

Spring around here is about BBQ and wildlife! Keeping the birds and animals safe while doing a bit of grilling on the side as well as gardening.

Here's a fun trick to get those spiraly, bouncy "Curly hotdogs" Simply stick a thin kebob skewer into one and then place flat on a cutting board and begin slicing on a diagonal and in one straight slice... as you slowly roll the hotdog (with the help of the skewer) it turns and you end up slicing lower and lower like the stripes on a candy cane! And voila!! Remove the skewer and you've got this fun spiral then just grill them up.
-1 pack hotdogs (We used 100% beef because they got so brown and caramelized, yum!) 
- 1 kebob skewer (or more, but you remove them once you're done) 
- cutting board

- sharp knife

Check out the video below for more of a visual instruction.
Heated grill and you're all set!


Tuesday, May 28, 2013

Summer Dinner and Spanish Dessert


I've so enjoyed last year's airing of "From Spain With Love with Annie Sibonney" on food network Canada.   If you've followed my blog in it's early days you'll know all about my obsession with Morocco and North African cuisine!  Through reading up on Spanish cuisine I loved seeing how the influence made it's way into Spanish Cuisine as well so I decided to indulge myself with a book that I picked up in one of the Chapters/Indigo locations and couldn't put down.  The rustic cuisine drew me in and I loved the use of almonds in so many recipe (LOVE almonds and we use them a lot in Middle Eastern cuisine too)

The recipe I made here is a pumpkin almond dessert, with hints of cinnamon and lemon zest it's almost like pumpkin pie but without the crust. Couldn't be simpler to whip up too!

 The recipe uses fresh pumpkin boiled until tender and then cooked some more until the water has evaporated and it's in it's puree form.  I'd love to try this one day with fresh pumpkin but for now I already had a can of pumpkin in the fridge that needed using up so I whipped up this dessert by cooking the puree stove top a bit and adding sugar to it.  In a separate bowl I mixed up the ground almond with eggs, lemon zest then mixing it all together, forming a dome shape and decorating with blanched almonds before popping into the oven for 50 minutes.  

It's finished off with a dusting of powdered sugar and a perfect accompaniment to a warm cup of black tea!


Arnadi (Valencia Dessert)

Adapted from Claudia Roden's The food of Spain book

Makes 8-10 servings

- 2 lb slice of orange pumpkin flesh.   (peel and remove seeds and string)

** I 3/4 larger can of plain pumpkin puree

- 1 1/4 c sugar

- 1 1/4 c ground almond
- 2 eggs
- zest of 1 lemon
- 1 tsp cinnamon

Garnish
- 1/2 cup blanched whole almonds 
Simply add skinned raw almonds to a pot and cover with water. Bring to a boil and remove from heat.  Strain and allow to cool enough to handle then slip the skins off using fingers and set aside for later. 

-  2 - 3 tbsp powder sugar

For the pumpkin, chop in 1 1/4 inch cubes and add to a saucepan with water and boil/steam until tender, checking on them from time to time in case water evaporated then add more if necessary.  Should take 15-20 minutes.
Strain the excess water and add back to the heavy bottomed saucepan over medium heat without lid and allow excess water to evaporate for 5 minutes.  Mash the pumpkin into a puree using a fork or potato masher. 

Remove off heat and add the sugar, add it back to the heat and mix until sugar is dissolved and all the moisture is nearly evaporated, another 15-20 minutes of cooking.

Preheat oven to 375 F.

In a separate bowl mix the ground almond with eggs, lemon zest and cinnamon.  At this point I let the pumpkin cool for about 3 minutes then add the pumpkin/sugar mixture into the almond mixture little at a time tempering it as not to scramble the eggs.

Pour into a small baking dish and form a dome, garnish with the blanched almonds and bake for 50 minutes.

Once it's done, let it cool completely and dust with powder sugar.

Enjoy! 


There is nothing better in summer time than an easy dinner and here I made lamb burgers and beef tenderloin shishkebob, all so easy to whip up and this dessert was just the PERFECT ending to the meal


Monday, May 20, 2013

Victoria Day long weekend


A look at the victoria day long weekend ... ice cream, thrifting, snacking, bbqing, and more ice cream!


Thursday, May 16, 2013

Creamy Frozen Lemon Dessert


Though these may look like mini cheesecakes, they're actually not ... these creamy little frozen lemon treats are just as rich but light at the same time and PERFECT for summer!

I've tried my hand at curd once before and it ended up a nice dessert when incorporated with freshly whipped cream and fruit, as you see here in my citrus curd with raspberries however this version is MUCH nicer as I love the frozen element to it, really brings out the citrus flavour and transforms the whipped cream into something else entirely!

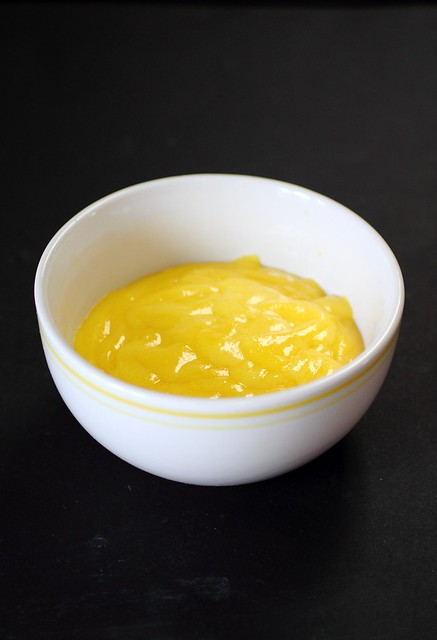
Start with the lemon curd, which is the easiest thing in the world to whip up especially with this recipe that only uses 3-4 ingredients and trust me in 10 minutes you'll have a luscious citrusy sweet curd with very little effort.


Easy Lemon Curd


- 6 egg yolks
- 1/2 cup sugar
- 1/2 cup freshly squeezed lemon juice
- 1 tsp lemon zest

Instructions:

1. Whisk egg yolks and sugar in a small saucepan and set aside.

2. Add lemon juice plus zest to the eggs/sugar mixture and cook egg mixture over medium-low heat, stirring constantly, until the mixture is thick. Should take 10 minutes to get to a gravy-like consistency. Pour the mixture through a fine strainer and allow to cool for 30 minutes.
Place a piece of plastic wrap directly on the curd and and refrigerate overnight or up to 4 hours.

If you'd like to enjoy it as is you can add a tsp of butter at the end as it's cooling and swirl it in for a nice sheen and richness but as it will be incorporated with heavy cream in this recipe we're using it as is.

Creamy Frozen Lemon Dessert

The following day or after 4 hours of lemon curd chilling ...

Prepare a muffin tray lined with 6-8 paper cupcake/muffin liners.

Whip 2 cups of heavy cream (35%) with a few drops of vanilla (and I added 1 tbsp powder sugar) until soft peaks form, stop at this point.

Using a whisk beat the curd as to break up the stiffness until it's pale and creamy.  Using a spatula add half the curd into the whipped cream and gently fold in incorporating.  Add the rest and at this point you can fold it in again or just gently swirl it in.

Fill your muffin cups and tap the pan on the counter a few times to release any air bubbles from the little desserts.

Chill in the freezer overnight or up to 4 hours again.


Blueberry sauce: 
2 cups fresh (or frozen) blueberries
1/4 cup sugar
1/4 cup lemon juice
zest of 1 lemon


- Add blueberries to a small saucepan, add lemon juice, sugar, as well as lemon zest.   Heat on high and simmer for 5 minutes.  Crush half of the blueberries (just using the back of a fork to create more of a sauce)

Allow to cool, then cover and refrigerate until needed.

To assemble dessert remove frozen lemon whips from freezer and gently remove the paper (it comes off easily, don't worry)
Set on plate and top with blueberry sauce! You could add lemon slices to the plate if desired for presentation.

Courtesy: Thanks to dieter's downfall for the recipe, she added ginger to her lemon curd which sounds AMAZING and I was super tempted but not everyone here likes ginger so next time I make these I'm going to be adding some spicy zestiness for sure! 


Sunday, May 12, 2013

The Mulberry Tree


Photos of yesterday's road trip to pickup my Illinois Everbearing Mulberry tree ... it involved homemade marble butter cake for the road, a little thrifting in guelph where I found some fun items including a severly tarnished footed silver tray, and other little kitchen items.

Through today's strong winds, rain and hail we put the tree in the ground. It was a lot of work but also a lot of fun, this little robin perched up on the fence of tree watching the entire time, I think he was excited seeing the earth being turned upside down with all the yummy june beetle grubs so I collected them for him on the deck and sure enough he was courageous enough to come down and fill up his beak taking them back to his little ones in a nearby tree.

I'm SO excited about this fruiting mulberry, been trying to track this variety down for a while now and happy to have found it at the Green Barn Nursery in Elora, Ontario which is just north of St.Jacob's and Elmira which we frequented quite a bit already this year for farmer's market trips and the maple syrup festival.  These guys at the nursery have a fabulous variety of fruit trees as well as tropical ornamental indoor fruit trees which I was tempted to buy but perhaps in the future!

So here's a cake recipe for you!
Marble Butter Cake 
Courtesy of Miss Tam Chiak

Yield 1 8-inch round 3-inch high cake in this preparation
Cooking time 1 hour Prep time 30 minutes 


Ingredients:
8 large eggs, separated
250g castor sugar
340g unsalted butter (3/4 lb or 1 1/2 cups butter)
250g all purpose flour
1 1/2teaspoons baking powder
1 teaspoons vanilla extract
2 tablespoons good quality cocoa powder
1/4 teaspoon salt
2 teaspoon lemon juice

Method:

1. Preheat oven at 160°C (325 F) with a wire rack in the middle. Use a spring form pan, do NOT butter or flour it though. 


Sift flour, baking powder and salt in a bowl. Set aside.


2. Cream butter in the bowl till light and fluffy. In a separate bowl, whisk the egg yolks with the 100g sugar till light. Gradually add this into the butter and beat on medium speed till just incorporated. Add in all purpose flour into the mixture in 3-4 batches.

3. Whisk the egg whites until foamy. Gradually add in lemon juice and the remaining 150g of sugar until stiff peaks form. With a spatula, fold in the meringue into the egg yolk mixture in 3-4 batches. Add in vanilla extract until incorporated.

4. Divide the batter into two, 3/4 in one batch and the rest in another bowl. Sieve cocoa powder over the lesser batch and fold to mix well. Pour batter into tin, alternating between the two mixtures, starting with the yellow batter. Rap pan on counter several times to eliminate air bubbles. With a long skewer, swirl around the batter to create the marble effect. Bake for 40-55 minutes or until a tester inserted into the middle of the cake come out clean.

5. Cool on wire rack completely before serving. Cake keeps at room temperature up to three days and can be frozen up to 3 months.

NOTE: PLEASE don't be foolish (like me!!) and use a kitchen aid/kitchen blender/mixer, it's not worth doing it all by hand :(((( 


... and finally here's a fun silver cleaning technique.
Wrap your piece of silver/silver plated loosely in foil and set it in a bucket big enough to hold it.  Sprinkle with baking soda (1 cup baking soda per every gallon water) and pour hot boiling water overtop.  Eventually the tarnish will begin to gravitate to the foil and it will turn black... after soaking remove the silver from the water and polish with a paper towel or soft cloth, as the cloth gets black use another corner or another clean piece of paper towel and eventually you'll have some pretty shiny silver!  I had to do this 2 times with the foil/boiling method and polished with silvo the following day.  It's getting there...