Saturday, July 26, 2014

Thank you AVogel !


Thank you A.Vogel for the lovely gift basket!!!  Another fantastic challenge this summer and hope we can do it again next year!


How do you Herbamare? 


Sunday, July 20, 2014

Portuguese Food


Ever since my discovery of Nova Era Portuguese bakery in my town I've been over the moon! They have the most amazing selection of breads and how can I forget the beautiful display with all kinds of pastries, flans and cakes!

Today I popped into their advertised (maybe sister business?) Churrasco of Portugal to check out their chicken. An entire bbq chicken is $10 and that's the price of a whole uncooked chicken at the supermarket so how could I go wrong...... and remember take out food can be pretty if you serve it up on nice dinnerware and add a few extra touches! ;)


Wednesday, July 16, 2014

Cabbage Dolma II


Here at AdventuressHeart we've done a lot of Dolma, and we covered Cabbage Dolmas as well as many Arabic style stuffed veggies. Today's post is really more of a reference and note to self (that's how my blog came about, publishing recipes for future references and for my sisters to hold on to foods from our rich cultural background)

Here are some of the older posts for Cabbage Dolma

Soak rice:
2 cups calrose rice, washed, rinsed and soaked for about 30 minutes to an hour

Prep Cabbage:

Bring a big pot of salted water to the boil. Remove the core of the cabbage and any outer leaves that are a bit soiled. Place the cabbage head into the water core side down and let it boil away on medium high for a couple of minutes.  Gently flip the cabbage over in the pot of water, now core side up, use a fork and spatula to carefully remove the outer leaves and place them on a nearby tray.  Return the cabbage to it's original position (core side down) and allow it to cook a little more, continuing the process of flipping back and removing a few leaves at a time and letting it boil further on it's core until all of the leaves have been removed. Don't worry about the tiny leaves in the core towards the end, just remove it and set aside. 

For the big leaves I cut out the rib/shaft and cut it into 3 pieces for easy and even stuffing/rolling.  


Reserve some of the water from boiling the cabbage and dissolve the following tamarind paste into it, simmering for a while if needed..

1/2 package tamarind paste (seedless) - those little square packages

Other Ingredients:

1 pack ground lamb

Pulse the following in a blender into a smooth puree:
5 cloves garlic
1/2 large red onion, peeled
1 bunch mint
1 bunch parsley
1 bunch cilantro (didn't have today)

1 tsp dry mint
1/2 tsp arabic 5 spice
1/2 tsp black pepper
2 tsp Turkish or Syrian Aleppo Pepper flakes

Just a little less than 1/2 cup olive oil

-------------
3 tbsp salt
-------------

2 tsp olive oil
3 tbsp tomato paste

In a large pot heat the oil and tomato paste, fry it around until it smells nice and caramelized. You don't have to do this step but it really adds another level of depth to the flavour. I love my tomato paste roasted. Use a spatula to scoop it out and add it to your puree mix.


For Later:


Juice of 1 1/2 lemon
More Olive oil


Assembly:

Drain the rice, mix it with the raw ground lamb, add the spice/herb puree and season with 2 1/2 tbsp salt (usually the rule is about 1 tbsp per cup of rice and with the lamb I added more to season it too)

In a large heavy bottomed pan drizzle a bit of olive oil and begin stuffing your cabbage leaves with the rice/lamb mixture. Simply add about 2 tsp of filling onto the bottom portion of the leaf and roll upwards like a cigar, nothing too neat or fancy and you don't have to tuck the ends in like I do with the grape leaves. Start with the smaller leaves as you can just use them whole and then use the outer leaves which you've had to remove the ribbing and divide into smaller pieces. Place the stuffed cabbage leaves into the pot layer after layer until you're done!

Place the pot on the heat (I start on high) - I tend to let it sizzle a bit since I've added oil to the bottom - we like ours really browned/burned!  Using a small heat proof plate set inside the pot and on top of the dolma to keep everything in place you can now add your liquid.

Heat the tamarind/cabbage broth up or if it's still hot simply add it over the top gently. You should see the liquid rise up between the cabbage but not cover it entirely ( remember the leaves and meat will all release more juices to cook the rice)

Drizzle juice of 1 lemon over top and you're ready to cover and simmer until tender. Cook for about an hour on low.

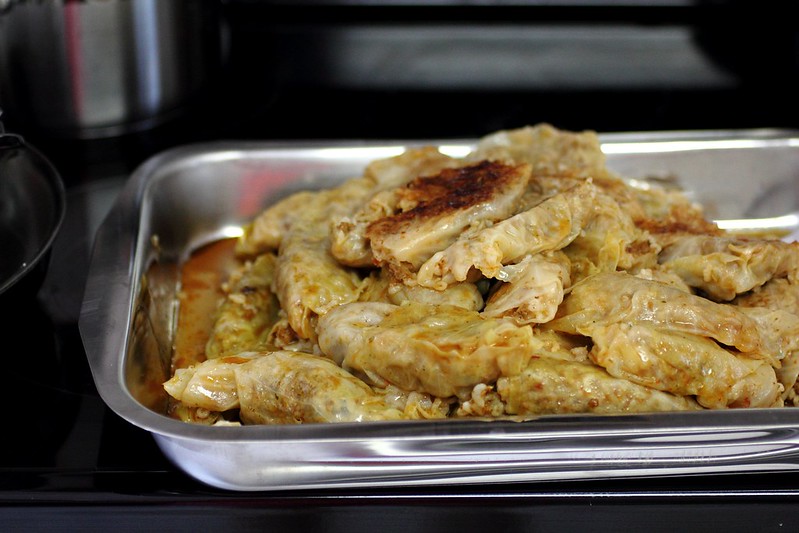
When it's done it will smell amazing and the rice will be cooked. Remove from heat, remove the plate on top (gently as it's hot!!) and set the pot aside to cool slightly. You can remove the stuffed cabbage leaves one by one or flip over the whole pot on a big tray which is how we like to do it. It's not only fun but a bit of table side theatrics!

Enjoy!

P.S I'd like to thank Mabel Younadam from Youtube for the inspiration to add Tamarind to the dolma, I've never done it this way before, normally we got used to using pomegranate molasses but tamarind is a lovely change!


Tuesday, July 15, 2014

Baklawa or Baklava, whichever way you say it, it's delicious!


BAKLAWA is here!! The long overdue recipe. I promised to post it last Ramadan and then Eid came and I planned to make it on the big Eid when we just had too many sweets that I dropped it from the baking list.

Now that we're in Ramadan again I hope you guys will enjoy this recipe either during the fasting month or for the upcoming Eid festivals at the end of the month !

Baklawa (or Baklava) may look intimidating but it's really VERY easy to do.

It requires three parts to the recipe so once you have all these parts ready it's just assembly.

PART 1: Clarified butter - If you choose to use something like desi ghee which is already purchased in a jar then that cuts down this step. Just need to melt it into a liquid state and let it cool slightly and it's ready to use.  If you're using butter then simply melt down an entire  pound of unsalted butter in a small saucepan and let it boil on medium high until it foams, remove the foamy part and keep cooking until crispy white bits form on the top, keep skimming all of the white bits off and make sure they don't brown so you can set the temperature lower if you need to.  The objective is to remove all the milk solids until all you're left with is a golden fat.  Cool it and have a pastry brush on hand to use.

PART 2: Syrup - It's super simple, in a saucepan add 2 cups white sugar and 1 cup water, bring to a boil until all the sugar dissolves and boil on medium high for 10 minutes, add 1 tbsp lemon juice and boil for another minute. Remove from heat and add 1 tsp orange blossom water. Set aside.

Part 3: NUTS or filling - The classic fillings are pistachio and walnut.

Pistachio - Soak raw pistachios (removed from shells, better to buy them this way already) in water for an hour - At this point you can rub them between your hands to remove the skins. I hope you have better luck with this step because it took me an hour to seperate the skins and then actually fish out the pistachio between the skins in the bowl of soaking water, the nuts nor the skins really float so if there is a better way to do this I'd love to hear it!  If you prefer to keep the skins on your pistachios I understand and you can just skip this step entirely.
Once you removed skins dry them well with a paper towel and then bake them on 300 F for 10-15 minutes without actually toasting them, just let them dry out.

Pistachio filling can either be ground down into a paste or used in a chunky form so you do what you like, I chopped them coarsely here in the blender on "pulse" but you're better off cutting them with a knife by hand if you're unsure how reliable your blender/food processor is. If you want a paste just grind it down.

In either case add 2 tbsp of the premade sugar syrup and 3/4 tbsp of the clarified butter to the nuts and mix well.

WALNUTS: This is a much easier filling, and my absolute favourite! Chop or pulse the walnuts into small bits (like the size of toffee bits) and then mix 2 tbsp sugar syrup and 3/4 tbsp clarified butter. (in my case instead of the clarified butter I used a roasted walnut oil that I had in my pantry from Olive That!)

With both pistachio and walnut I started out with about 1 3/4 - 2 cups of nuts and then chopped or pulsed them down.


The final ingredient is your phyllo, you can purchase this from your local supermarket in the freezer section or it's easily found at Middle eastern, Arabic, Turkish or Greek stores.  Thaw in the fridge the night before.

From this point on it's very simple. I advise you to follow the photos here on Taste of Beirut's website so you don't get confused.
Simply cut the phyllo pieces into the size of the pan by laying the pan over and cutting to size.  Keep the phyllo under a damp (not soaked!) towel or paper towel to prevent drying out, this is important!

Butter the bottom of the pan and lay 2 sheets down, then drizzle a bit more clarified butter and brush it evenly with a pastry brush. another 2, repeat the process until 10 sheets are done.

Now I crumple up a couple of pieces that I had cut away from the phyllo (the excess) and lay them on top of the buttered sheet, drizzling lightly with more clarified butter and laying one more sheet overtop. 

Now add your nuts and really spread them out nice, dense and evenly inside the pan. 

Begin layering more sheets and clarified butter... 2 sheets phyllo, clarified butter, another 2 sheets, clarified butter, another 2 sheets... etc. about 10 minimum or go up to 16.

Finally a layer of butter and tuck the edges in lightly if needed. Score the whole pan by cutting through straight to the bottom in a desired pattern with a very sharp knife. This part is tricky so do it very carefully as not to mess up the layers. It may be easier if you had a pizza roller or a bench scraper with a sharp edge to simply chop down in one go. I have to experiment with this further to see what really works.

Bake in a 350 F preheated oven for 45 minutes then remove from the oven and drizzle with about 3/4 to 1 cup of the premade sugar syrup.  It may be easier if you resliced it again with a sharp knife then spread the syrup over to get it really absorbed into the cracks.

Let it cool down and store in an air tight container for up to 3 weeks! 


Thursday, July 10, 2014

Cottage Life!


My first cottage experience! We visited the Halliburton area of Ontario for the weekend and it was absolutely GORGEOUS and what an experience!! Here's a couple of shots I captured along the way.