If you ever find yourself with some goat meat on hand and you're thinking to yourself "What should I do with this?" then this is the recipe for you!
Kenyan Goat stew, I found the recipe through an article, written about a Kenyan Chef as he explains that this meat can be trickier to cook than other meats I was able to get a brief guildeline on how to cook it.
This recipe could not be simpler, and what I like the most is that there is no browning required, it's all very straight forward by adding a couple of new ingredients to the bubbling pot every couple half.
Starting with the goat meat I had on hand. This small package of stewing meat in my freezer came from a local goat farm here in Ontario called Cross Wind Farm, I had picked up a couple of their products from a farmers market during the late summer months. They're absolutely worth checking out for all your goat needs! (Try their goat feta and goat pepperette style sausages, to die for!)
Kenyan Goat Stew:
Ingredients:
Goat (1 lb)
Garlic (4 cloves)
Spices - cumin, curry, garam masala, ground coriander, cardamom, turmeric, paprika, ground ginger, cinnamon,
Aromatics: Tomatoes chopped (I used half a tin of san marzano) , Onion (half a white onion, chopped in medium dice), green pepper (1 whole, small dice), red pepper (1 red pepper, small dice)
Herbs: Cilantro (1/2 cup stems removed and leaves chopped)
Optional: Potatoes, this was my own addition, as I didn't want to cook something else on the side to eat with it so I simply threw some potatoes in towards the last 30 minutes.
Step 1: To begin add the fresh or thawed (from frozen) goat meat in the bottom of a large pot. Cover with lots of water! Adding a couple of peeled cloves of garlic here is a good idea tooKenyan Goat Stew:
Ingredients:
Goat (1 lb)
Garlic (4 cloves)
Spices - cumin, curry, garam masala, ground coriander, cardamom, turmeric, paprika, ground ginger, cinnamon,
Aromatics: Tomatoes chopped (I used half a tin of san marzano) , Onion (half a white onion, chopped in medium dice), green pepper (1 whole, small dice), red pepper (1 red pepper, small dice)
Herbs: Cilantro (1/2 cup stems removed and leaves chopped)
Optional: Potatoes, this was my own addition, as I didn't want to cook something else on the side to eat with it so I simply threw some potatoes in towards the last 30 minutes.
I had a tiny package of meat on hand, not exactly cure how much, might have been a pound, so it probably wasn't necessary to add to much water but I did anyway. I used 4 large cloves of garlic.
Set the pot on the burner and bring to a medium boil, watch out with this stage as the foam rises to the top and sometimes it over flows. Skim the scum stuff that floats to the top away and discard.
The pot should be at a medium boil most of the cooking so finding that sweet spot on your stove/burner is key because it's going to be cooking for around 3 hours start to finish. Having the cooking fan on too is a good idea too.
Cook for one hour
Step 2: Add the following spices: a dash or 1/2 tsp of each Cumin, Curry, Garam masala, Cardamom (I used ground from my baking supplies but you can use the whole pod, throw about 4 pods in)
(salt to taste)
Cook another 30 minutes.
Step 3: Add aromatics, chopped tomato, onion, red and green pepper.
Cook for 45 minutes. At this point you may want to cook with or without the lid depending on how much liquid is left in the pot. You don't want to end up with a lot of liquid at the end. It should be a proper ratio of ingredients to liquid like any other stew. If you need to boil off a little of the liquid them absolutely do so. I tried to keep doing that with every step along the way.
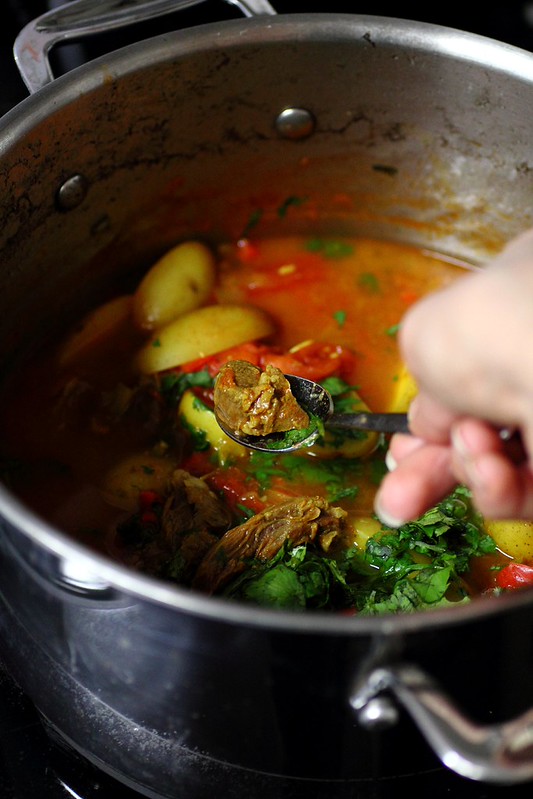
Step 4: Add more spices.... turmeric, ground coriander, ground ginger, fennel seeds, cinnamon and paprika (half a tsp of each)
At this stage I would add potato if you're including them, about a handful of those baby potatoes sliced in half each.
Simmer for 30 minutes.
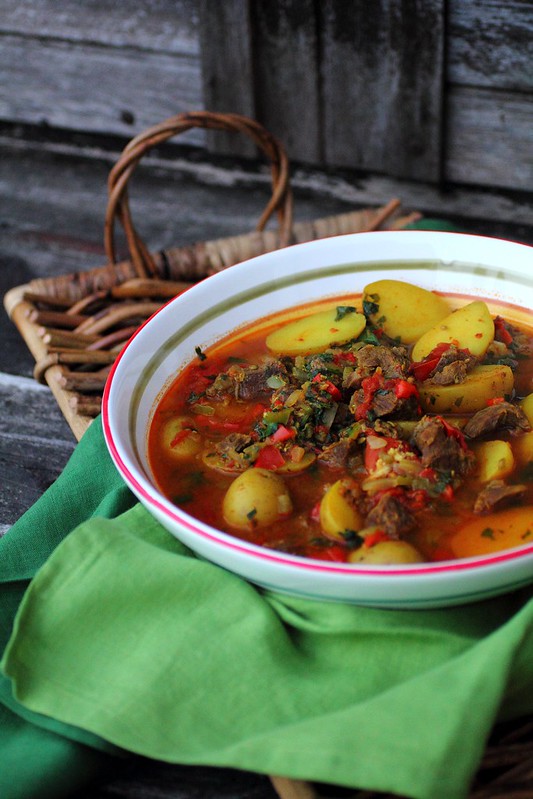
Step 5: Add chopped cilantro. Allow to cook for another 5 minutes and then remove from the heat and serve!
There is no mention of adding salt in the recipe but I did, around stage 2.
The goat in this recipe was so tender, falling off the fat (there were no bones in my goat but I would imagine some bones would be fine and add to the flavour)
So what do you think? I hope this recipe inspires you to try goat, because it is a very yummy meat and this recipe taught me that cooking it is not as intimidating as I had previously imagined.
And finally one last note, if you found the spices to be rather mild then next time you're making it feel free to add more and gauge it to your taste.
At this stage I would add potato if you're including them, about a handful of those baby potatoes sliced in half each.
Simmer for 30 minutes.
Step 5: Add chopped cilantro. Allow to cook for another 5 minutes and then remove from the heat and serve!
There is no mention of adding salt in the recipe but I did, around stage 2.
The goat in this recipe was so tender, falling off the fat (there were no bones in my goat but I would imagine some bones would be fine and add to the flavour)
So what do you think? I hope this recipe inspires you to try goat, because it is a very yummy meat and this recipe taught me that cooking it is not as intimidating as I had previously imagined.
And finally one last note, if you found the spices to be rather mild then next time you're making it feel free to add more and gauge it to your taste.
If you're left with any of the delicious liquids from the stew I have a couple of recipes you could try to use it up (do not throw that stuff away!)
Try making my famous Tuna Rice by cooking rice and tuna in it. Or making a lentil soup, it could be very similar along the lines of a Moroccan Harira soup or a plain red lentil soup, use the broth from the stew with extra water to simmer the lentils then whisk for a creamy flavourful soup!