Friday, January 25, 2013

Guava's 'n' cream


Strawberries and cream, peaches and cream... how about guava's and cream.  I love the combination, especially in milkshakes.  My mother used to make me guava milkshakes when I was really young back when we lived in Pakistan, they were my favourite!

I picked up some guavas at the supermarket this week and have been eating them over the week but today wanted to do something a little different. I googled guava salad but nothing really came up that caught my eye so I headed into the kitchen and took a whiff of the lovely fragrant little fruits to get some inspiration.

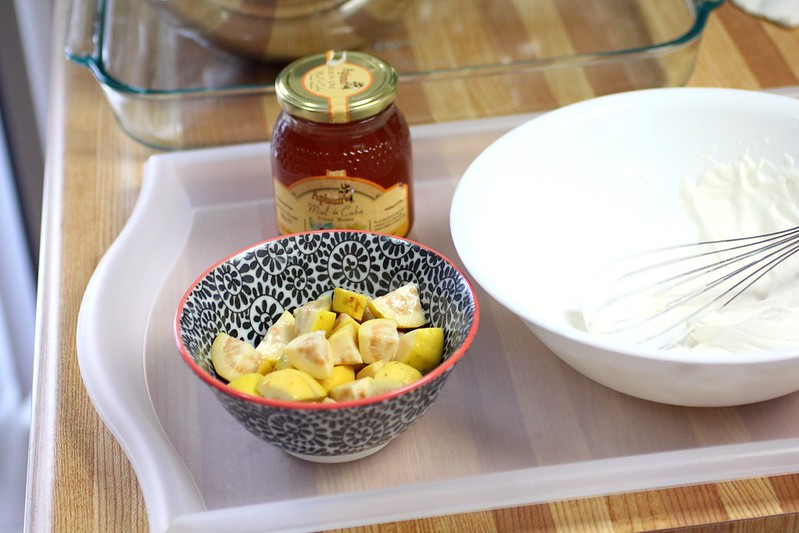
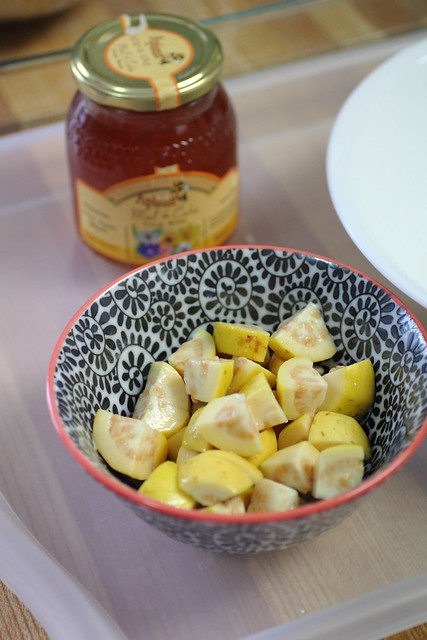
Whenever I'm on vacationing down in Cuba I enjoy these fruits for breakfast, lunch and dinner if I can, they're always so pink and lush and irresistable.  The honey I brought back from Cuba sitting in the far corner of my counter caught my eye so I took a tbsp and heated it with a drop of water in a small sauce pan. 

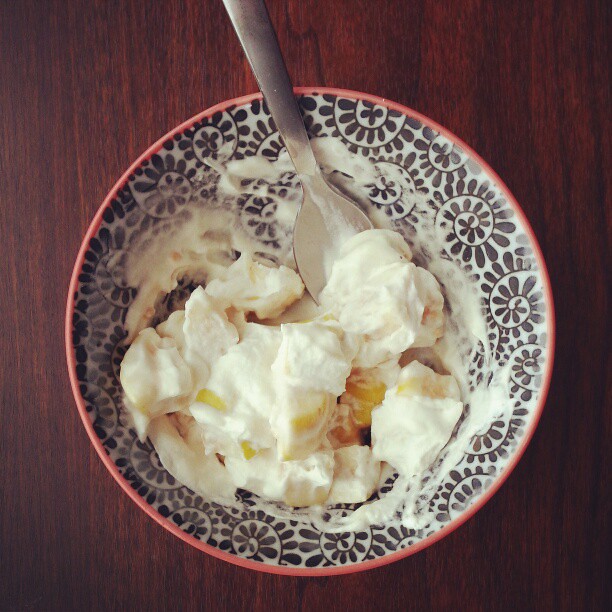
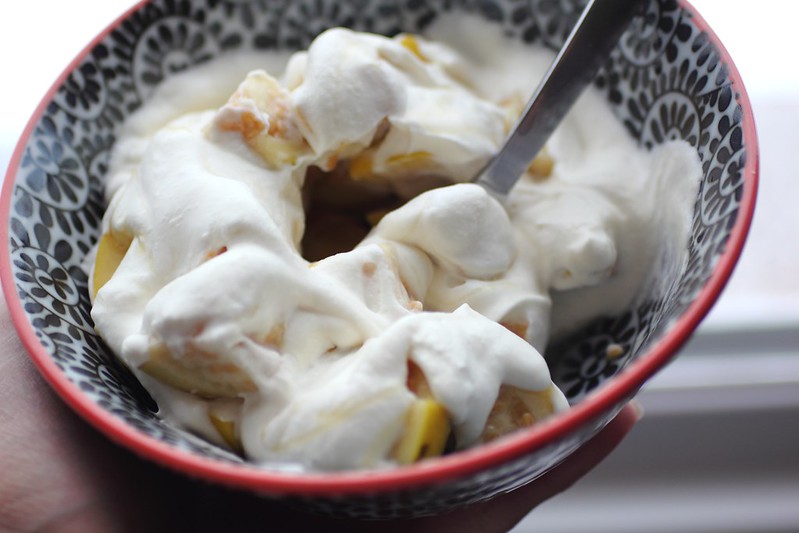
In the mean time I chopped my giavas in rough bite size cubes (you just wash them and cut the ends off then chop them seeds/peel and all to eat) 

When my mixture came to a boil and after putting my little guava jewels into my serving bowl I drizzled with the warm mixture.    It looked good enough to eat at this point but I always like to make things a little extra special so I reached for the whipping cream in the fridge and whisked up a tiny drizzle into soft peaks (no sugar necessary) just a splash of natural vanilla extract. 


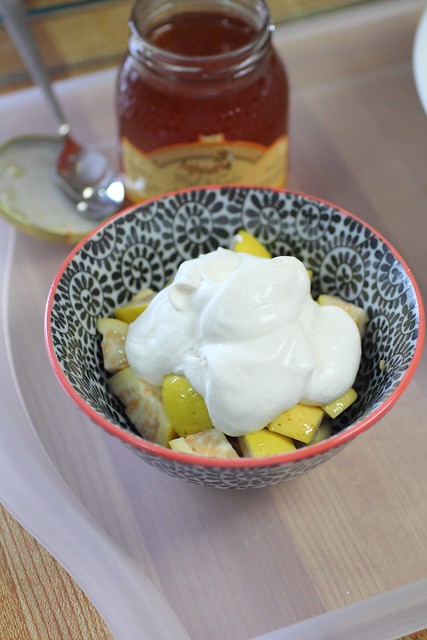
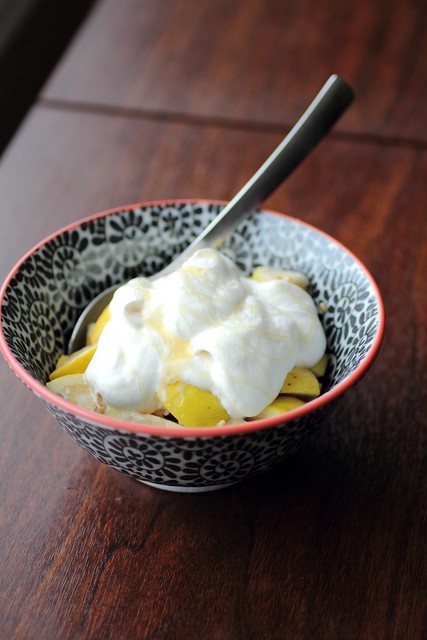
Now I topped my guavas with a few spoonfuls of the soft whipped cream and with a final drizzle of honey it was ready to dig in.  While sitting at the window and watching the fluffy snow flakes fall from the sky I have to say this really hit the spot with the tropical flavours of the guava and golden Cuban honey, it took me right back to a warmer place.

- 5 mini guavas, chopped in small bite size pieces
- 1 big teaspoon honey, a drizzle of water
- 1/2 cup heavy cream
- Splash of vanilla extract
- Another drizzle (1 tsp) honey

To make it even more tropically (and vegan!) use coconut cream whipped into a soft cream and top guavas instead of dairy cream.


Thursday, January 24, 2013

Fennel and Orange


I've been watching a whole lot of Jamie Oliver lately, especially 15 minute meals and I'm lovin' every moment of it! 

Today I bring you a Jamie Oliver-esque menu, however this unfortunately did not take 15 minutes, not even 30... more like 15 hours (don't dispair yet! I'm just including the brining time)


I'm a big believer in brining chicken, HOWEVER after rotisserie roasting this chicken for nearly 3 hours in my hamilton beach toaster/rotisserie today I realized that it is totally unnecessary.  

Normally I brine for 24 hours at least and then roast on high temperatures and it yields a juicy chicken but it seems that is not the case with rotisserie so I'm better off just marinating in lots of lemon juice, salt, crushed fennel seeds, garlic and then going ahead roasting it on the spit after being rubbed down with olive oil. 

So cutting out brining cuts down on the prep time a lot! 

Feel free to go about prepping your chicken however you like, you could even follow Jamie's 15 minute method of seasoning, smashing it down and then cooking in the pan for about 3.5 minutes on each side until it's crispy dark on the outside and juicy, moist and white on the inside. 

The interesting food element today is the Freekeh/Freeka/Freekah, or even freaka!  This is a middle eastern ancient food, it's basically a green young fresh wheat that has been harvested and I believe they burn the husks off using fire so you get this smokey (not really toasty) but roasted firey type of taste from it, really amazing. 


I didn't need to add anything to it, just cooked in water with salt and olive oil.

Basic Freekeh: 

-1 cup freekeh grain

- 4 cups water
-1 tsp salt
-1 tbsp olive oil

Wash grains under water and remove the husks that float to the top, drain well and add 1 tbsp olive oil.  Cook on high heat until it sizzles/toasts slightly in the oil.  

Add salt and boiled water, reduce heat to low, cover and cook like rice.  
It takes about 40 minutes to cook and after 30 minutes I removed the lid to let the extra liquid evaporate.  
It does not cook like dry grains of rice, it has a bit of a sticky residue kinda like risotto (but it shouldn't be mushy or crunchy)  it's delicious!  

The box said to use 5 cups of water but even 4 was too much for me (thus letting it evaporate in the last 10 minutes with lid off) 


Another fun element I added to the dish was roasted tomatoes with garlic.

Oven Roasted Tomatoes and Garlic:


- 2 large tomatoes
- 1/2 head of garlic, separate the cloves, leave the peels on! 
- 3 tbsp olive oil
- salt and black pepper

Prepare a tray with parchment, heat oven to 300 F.
Chop tomato in fat wedges (8 pieces for each tomato) 
Toss with olive oil and seasoning, add the garlic cloves and toss along with it. 

Lay flat on a tray and bake for about an hour or two, flipping them halfway through cooking.  You just want their flavours to intensify and get a little browning on the tomatoes, they don't need to "dehydrate" 

See the photo below for a guide. 


Fresh Orange Salad: 


- Garden greens or "Spring mix" 

- 1 tsp orange zest
- 1 orange, peeled and segmented
- Juice of the 1 orange used above
-1 medium clove garlic 

- Lemon juice
- Olive oil
- Salt and black pepper


With fennel seeds on the chicken I went with orange in the salad. Plenty of bright fresh orange zest, salt, a crushed garlic and olive oil along with segmented orange pieces and the leftover orange juice with a squeeze of lemon made a gorgeous salad dressing, tossed with mixed greens it was fabulous! 


Begin by plating freekeh on a platter, arrange tomatoes overtop.  Sprinkle garlic bulbs around (it's ok if they're still in their peel, just pop them out and eat!) . Top with sliced chicken breast (or whatever parts you like, I love the legs but I didn't add them here although I did enjoy them with the meal!)
Sprinkle with chopped green onion and sprigs of cilantro. 
Serve salad alongside and enjoy!

Move over Quinoa ( just shove over) and leave some room for Freekeh, I think these two grains (alright, alright, I know quinoa is a seed!) are going to have to share the spotlight on my pantry shelf because they're now both my favourites!


Monday, January 21, 2013

Sweet and Salty pan fried plantain: Nature's dessert


I call this nature's dessert, because it's soft, starchy, sweet and fruity and no fussing required, just a ripe plantain, pan fried and sprinkled with a pinch of salt.  A perfect indulgence, I think.

If you like sweet and salty things and you want an easy dessert (healthy too, maybe?) then you'll love this, and even if you're not a fan of banana/banana desserts like myself (you'll probably love it if you're a banana lover) then give it a try. 

A plantain is that starchy banana that is usually green and found in the Caribbean/African section of your local grocer.  You want to find a ripe one that is almost yellow, if not then just set it on your kitchen table and wait for it to ripen.

It should be almost black, really, that's when the sweetness comes out, this could take a while but just forget about it and when it's ready it's only a matter of seconds to whip this dessert up.

Heat a bit of oil in a skillet on medium high. 
Peel your plantain by cutting off both ends with skin on and then pulling the peel off the middle part. 
Slice into 1/2 inch rounds or on a bias/diagonal so you have more surface area on each piece to brulee. 

Add your pieces to the pan, do not overcrowd so do it in batches (I did it in 2) and brown both sides flipping and making sure they don't burn (they've got sugar in them so they will brown quickly) 

Now set them on paper towel and sprinkle with salt.  Enjoy them right away when they're still slightly crispy. 

Just eat with a fork, and here I had some Forever nuts tea from David's Tea to go along with it. 

So good! 


Old fashioned Sugar coated donuts


I spent my sunday making donuts, it was a spontaneous spur of the moment type of thing so today I'm sharing not one but 2 old fashioned donut recipes.  The yeast and the cake donut. 

Let's start. 

The yeast one needs a head start and this is grandma's German Kreppel Recipe:

Proof in a cup:

- 1 1/2 tsp yeast
- 1/2 cup of water 
- 1 tsp sugar


Add to kitchen aid: 

- 1/4 cup soft butter
- 1/3-1/2 cup sugar

Cream together. 

Add 2 eggs, adding one at a time.

Add vanilla, lemon zest.

Mix 1/2 tsp salt with 3 cups all purpose flour

Add this mixture to the kitchen aid along with the proofed mixture and:

- 1/3 - 1/2 cup milk


Adjust the flour to make a nice firm dough that comes together. 

Proof dough for 2 hours or until doubles in size. 

Roll out to half inch width and let it proof on the counter covered with plastic for another 10-15 mins then cut in shapes or squares and fry until golden. 

Roll in sugar and serve. 


For the old fashioned sugar coated cake donut I happened upon this interesting recipe by Natasha at Sweet Sugar Bean 

We struggled with the ratio of flour to liquid in this recipe at first, but upon some comments back and forth we sorted out the issue.  I adjusted the flour myself to yield a donut dough and she adjusted the amount on her page after seeing the feedback from myself and another commenter.

I'd say in total I used about 3 cups flour, and then the ratio of liquid was about 1 cup and 2 eggs (being liquid) was on top of that. 
Lots of fresh grated nutmeg and it was fabulous!

If you're looking for 2 old fashioned family style sugar coated donut recipes that are super easy then your search stops here because these two recipes are keepers for sure.

Both recipes can be halved successfully or doubled, I halved my yeast donut recipe and they're on the plate on the far right (A pretty good amount for us I think)  I should have done the same with the cake donut but it's ok, I have an idea for the leftovers!


Friday, January 18, 2013

Sicilian shaved fennel salad

 Sicilian shaved fennel salad from Jamie's 15 minute meals:

(recipe customized for 2 servings)

1/4  of a large fennel bulb (if using a small bulb then use half of it) 
1 inches of a celery heart 
1 spring of fresh mint 
1/4 lemon (slice both halves off the end and use the middle peel and all, just shave it in the mandolin until it's super thin - almost see through) 

(1/4 shaved red onion - optional! I love red onion and this is my addition to the salad) 


Use a mandoline on fine to shave all of these down, including the lemon!! If making a larger batch use a food processor with a shaving blade. 
With the mint simply pile the leaves on top of each other, roll them up and slice thinly into strips. 


Add all to the bowl, including the juice from the lemon that will collect below the mandoline. 


Drizzle with olive oil, a pinch of salt and a splash of vinegar (whatever you like to use!)

Enjoy!


Monday, January 14, 2013

Mini beef and mushroom pot pies


On saturday we had mini chicken pot pies and since I had stewing beef on hand and leftover pie dough I was  in the mood to try some experimenting in the kitchen.

This is not a beef stew with a bit of crust over top, instead I started as I always do with grandma's traditional German gravy recipe.

Ingredients:
-1 lb stewing beef, at room temperature (let it stand out about an hour or until it's no longer cold to the touch)

1/4-1/2 cup butter

2 bay leaves

Salt

Heat large pot or dutch oven on high heat, add butter and once it is sizzling add meat in one even layer on the bottom.  Now just step away and let it do it's thing.  From time to time come back and scrape the bottom of the pot with a metal spoon and turn the meat.
Turn heat lower if needed but this process takes some time and the water from the meat should not come out and cloud the pot, if it does it will come out in small amounts and dry up then begin to brown again.

Meat should be browned well all over.  At this point I season with salt, and add bay leaves and cover with water.

Cook on low for about 3 hours or until meat is fork tender.

Usually I thicken it and serve with mashed potaotes or  poutine..  or potato pancakes and sauerkraut but today I left it as watery meat juice/stock and used this as my pot pie base.

If you're doing this the day before then that is much more ideal, just cool it and put it all in the fridge.

When ready to make the pot pies you will strain the cooked meat from the stock and set aside.

Chop some mushrooms (creminis' are nice) about 4 large ones chopped in a large dice)

Sautee in 2-3 tbsp olive oil on high heat and once they are nice and "Brown" salt them slightly and set aside in a bowl.  Add 2 tbsp Worcestershire sauce to mushrooms.

If you want to add potato then it's up to you, I didnt' but you would do what I did in the chicken pot pie, peeling a few tiny potatoes and cubing then boiling in salted water and straining.


To make the sauce:

Mix butter and flour in the pot used to brown the mushrooms.  This is going to be a super dark rich roux, almost like making gumbo so I set this on low and let it really take on some colour.

Set the beef stock near by, and when the roux is nice and brown bring up the heat to medium high and begin to add stock and whisk to thicken.  If you need some water from the kettle go ahead and add that in.  Taste for salt and season to taste.

Set this sauce aside when it is thick like a gravy and coats the back of a spoon.

Heat the oven to 400.

Roll out the dough and cut into circles. Set aside in fridge to stay cool.

Divide stewed beef cubes among ramikins and then top with mushroom mixture.  Ladel enough sauce over top (about 1/2 cup or so)

I added 1 tbsp dollop of sour cream on top of mine, and then proceeded to cover with dough and brush with  beaten egg.

Bake for about 20 minutes with ramikins on a foil lined tray and broil until nice and brown (staying close to the oven because it takes only a few seconds!)

I hope this inspires you to also make some fun little pot pies!


"Get well" Party


It's flu season and everyone I know is sick, but we still wanted to have some fun so we threw together this party on a whim and it has a bit of a "get well" theme with fresh fruits, tea and comfort foods like mini chicken pot pies.
Mini pot pies: 


Start with chicken:

You can do this the day before and it's very easy. 

Add chicken to large stock pot, cover with water and add about 3-5 tbsp salt and one squeeze of lemon juice.   You could add garlic, onion, celery but let's keep it easy and simple. 

Place pot on heat on low (chicken can stand for 30 minutes to reach close to room temp) and then heat it starting on low until it's medium low but no higher so it can poach gently.  Will take about 2 hours. 

When chicken is done (it should be cooked all the way through) remove from stock. 

At this point you can reduce the stock by boiling with lid off (not on high, just mediumish and it will reduce (keep in mind it will be pretty salty if reduced too much. 

Cool the stock down and store in the fridge. 

Remove meat from bones and chop, place in a container in fridge. 


When ready to make pot pies start with the pastry: 

Pastry: 

2 1/2 cups flour

1 1/2 tsp salt

1 cup cold butter, cut in small cubes

1/4-1/2 cup ice cold water

1/2 tbsp white vinegar (or lemon juice) 


Add salt to flour, add butter and use hands to blend using thumb against fingers to press the butter and flour together until it's a "crumb" like consistency. 

Mix water with vinegar or lemon juice and add to the dough 1/4 of a cup first and if you need more add more, up to 1/2 cup. 

Bring dough together and flatten into 2 flat round disks (for easy rolling) 
Wrap in plastic wrap and set in fridge.


Veggies: 

Chop veggies

1 cup celery
1 1/2 cup carrots, diced or sliced into rounds if using tiny carrots
1 medium onion

Brown veggies in 2 tbsp olive oil and add chicken stock.  Cook until tender.  

Strain veggies and set aside.  Set aside stock as well for cream sauce (below) 

Peel 3-4 small potatoes or 2 medium potatoes and chop into tiny cubes. Add to a small saucepan of salted water and boil until tender.  Strain, cool and set aside. 

Prepare a small plate or frozen peas. 

At this point remove pie dough from fridge if it is solid so that it can soften on the counter for rolling. 

For cream sauce: 

Add equal parts butter and flour to a pan (I use about 1/4 lb which is 1/2 cup butter) and then about 1/3 cup flour and mix well on medium heat.   Add 3/4 cup heavy cream of milk (or half of each, depends on how rich you like it)  

Add stock and boiling water from kettle, about 2 cups or more. 

Stir/whisk on medium high heat until mixture thickens like an alfredo sauce consistency. 

Remove from the pot and set aside (covered with a cling wrap right up onto the surface so that it does not develope a skin) 


Roll out pie dough until it's about 1/3 inch thick and using a glass or round cutter cut enough circles to fit and number of individual oven safe ramikins. 

Preheat oven to 400 F 

To assemble pot pies layer with chopped chicken, carrot/celery/veggie mix, steamed potatoes and a sprinkling of peas in each. 

Ladel about 2 tbsp of cream sauce over each. Cover with layer of dough and brush with egg (1 egg cracked and whisked) 

Set all the ramikins on a tray (line tray with foil incase they bubble over) 

Bake for about 20-30 minutes or until dough on top is cooked and broil if needed to achieve a nice golden crust (stay close to the oven when broiling as this process goes very quick, one minute it looks white and the next it can go straight to BURN) 

Enjoy hot or warm. 

Blooming garlic bread (from the"midnight" buffet which we always seem to have after a long fun day) 

1 large sourdough bread or Italian style bread (a nice crusty bread is best) 

Slice into it creating a "checker" pattern using a serrated bread knife. Do not cut all the way through, just stop once you feel you're getting close to the bottom. 

Now either you can make a raw garlic butter or a cooked one:  I made it raw (meaning it's just grated garlic and room temp butter slathered in between the cuts. 
For a cooked version just sautee your garlic in the butter until it smells like the garlic bread we all love and then drizzle this mixture in between the cuts in the bread. 

Salt your butter slightly either way. 

For additional goodness I added small pieces of brie cheese in between so they melt into gooey deliciousness. 

Get a large piece of parchment and crinkle it up into a ball, now wet it under the faucet and shake it out so it's not dripping. 
Wrap your bread in the parchment and bake on 400.  When the parchment is dry and the bread is crisp on the outside with soft melted cheese on the inside then it's ready.  About 15 minutes or so. 

You can sprinkle with chopped chives and enjoy pulling the pieces of bread apart with your guests!